DB Adapter Select Query Dynamic IN Parameters

                
I came across a scenario where we need to pass IN parameters dynamically and number of parameters are not fixed. If we design query like below it will accept only one argument

Select * from CUSTOMER where CITY IN(#IN_City)


As we don't know the number of arguments at design time, one option we  tried is inject multiple arguments as comma separated string ( Pune,Banglore,Hyderabad). But DB adapter tries to read the argument as a bind parameter and not SQL string. Then we changed query as below 


Select * from CUSTOMER where CITY IN (
select regexp_substr(#IN_City,'[^,]+', 1, level) from dual
    connect by regexp_substr(#IN_City, '[^,]+', 1, level) is not null
           );

Now we can pass the same comma separated string as argument at both the places. 

Select * from CUSTOMER where CITY IN (select regexp_substr('Pune,Banglore,Hyderabad','[^,]+', 1, level) from dual

    connect by regexp_substr('Pune,Banglore,Hyderabad', '[^,]+', 1, level) is not null
);
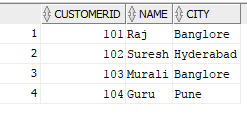


To design argument as comma separated string we will use “oraext:create-delimited-string” function in BPEL. Design Synchronous BPEL which takes array of arguments and use DB adapter pure SQL operation to execute the query. I am using SOA 12.2.1.3 version and Oracle DB 11g.

Create a SOA Project 


Create Synchronous BPEL process


Change the input xsd to take multiple arguments so added maxOccurs="unbounded" for input element


Right click on the External References -> Insert Adapters -> Database


Select Execute Pure SQL as Operation Type


Enter the query in the SQL box, it will automatically generate a XSD based on the query.


We can see the input and output elements. If we observe for input elements type is empty 


 Provide the type as xs:String


Keep default settings as it is and click Finish. Join BPEL and DB Adapter. In BPEL use invoke activity and create DB input and output variables.


Drag and drop transform activity between receive activity and invoke activity


In transformation take Source as input variable and Target as DB adapter input variable.


In transformation pass same expression for both arguments


Now deploy the code and test. While testing give array value as 2 so input will take two values


If you observe the flow trace we can see DB input as comma separated string


Service virtualization using OSB


service virtualization is one of the main feature of OSB. Service virtualization is the abstraction of a physical service through a proxy or intermediary service. In service virtualization, the service intermediary interacts with the service consumer and hides the physical location of the service provider. In other words, communication between the service provider and service consumer is done through a service intermediary, creating a gateway for application integration.


 In this Use case we will use one of the external web service which is available over web and will call that webservice from OSB. There are numerous webservices which are available in Online one  such kind webservice is Bank BLZ Service (http://www.thomas-bayer.com/axis2/services/BLZService?wsdl). By using this webservice we can fetch Bank Sort Codes (called Bank BLZ codes) for banks in Germany. In the request, you need to pass the BLZ code for any bank in Germany and it comes back with the bank details.


Create new project named BLZ service


Create folder structure like below


Copy the WSDL file from location http://www.thomas-bayer.com/axis2/services/BLZService?wsdl and place under WSDL folder

Creating Business Service

Drag and drop HTTP component from Technology palate to External Services lane.


Service Name: BS_BLZService
Location: browse through “BusinessService” folder we created in earlier step

Transport: http


Select “WSDL” from available options and browse to wsdl location

populates wsdl file with port after reading the WSDL file we have chosen in the previous step


populates the endpoint URI for the exposed web service to be invoked

Click Finish


Business Service is created on the External Services lane and this exists under “BusinessService” folder

Create Proxy Service


Drag and drop HTTP component from Technology palate to Proxy Services


 Fill up the mandatory details
Service Name: PS_BLZService
Location: browse through “ProxyService” folder we created in earlier step
Transport: http

Checking “Generate Pipeline” check box will create pipeline along with Proxy Service


We will use the same WSDL that we used to create business service


populates endpoint URI


Proxy Service is created on the Proxy Services lane and this resides under “ProxyService” folder


Connect Pipeline with business service


Double-click on the PS_BLZServicePipeline which opens up in new editor with .pipeline extension. Here Routing node inside route node is created automatically when we wire pipeline with business service


Testing the Service Bus project deploying into the IntegratedWeblogicServer


Request


Response


MFT SOA Integration

This post describes about how to Integrate Oracle Managed File Transfer and SOA


A SOA target in Oracle Managed File Transfer corresponds to an MFT service binding component in SOA or simply we can depict above scenario as


Even though above diagram depicts the flow is from MFT to SOA but while developing we will first create SOA composite and will give the SOA composite endpoint URI in the MFT target. So, high level steps are


  • In Jdeveloper Create SOA project with BPEL in components section and MFT Adapter in service Section. Deploy the SOA project and get the endpoint URI.
  • In MFT Create Source as file and create target as SOA by providing the Endpoint URI 

Create BPEL with define services later


Create MFT Adapter at service section


Click finish and join MFT adapter and BPEL


In the Bpel create Receive activity wire it to the MFTService  and set input variable Check the check box for  Create Instance.


Create reply activity


Add assign activity


Deploy the project MFT_SOA_Integration


Copy the endpoint URI we will use this when creating MFT target


Login to MFT Console (http://host:port/mftconsole)


Go to Design tab to create the MFT Artifacts(Source,target,Transfer)

create source


We can also give other properties but as of now we will leave other values to default


Now create target by providing the SOA Endpoint URI


In the advance options keep message type as text


Create Transfer


Add the already created source and target in the transfer


After adding source and target to transfer


In the Source add content filter as Sample*.txt which means that we are going to read files of above pattern


In the target side set delivery preference, as inline which means until the file is of 1048576 bytes data in the file will be sent as payload. If file size is more than that file will be moved as reference


Now save and Deploy


Keep the file in the location (D:\DEMO\MFT) with some text.
Now go to Monitoring tab you can see our deployed Transfer


Go to Transfer Instances and instances


If we click the “id” of instance we can see the flow


Now go to BPEL we can see the instance is created for the soa project


Open the flow instance


In the above scenario we are getting file content in the payload .If the file size is more than 104850 bytes we can get the file as reference.


Now create file size more than 104850 and resubmit the transfer in the monitoring tab new instance is created with file in reference